みなさん本当にメリークリスマス。Red Hatのさいとうです。
Ansible Advent Calendar 2024の今年最後の記事です。例年、最終日の記事では、翌年の予想をしているのですが、昨日のよこちさんの記事で紹介されていたとおり、AWXのリニューアル工事が進行中で来年の予想がさっぱりつきません。もう今年は来年の予想をあきらめました。来年はおとなしく運命を受け入れるのみです。
そういったわけで、今日の記事では、来年の安定したAnsibleライフに向けて開発環境をコンテナに移行してみたというお話をしようかと思います。
大掃除の時期です
僕は、Ansibleのエンジン部分やモジュール・プラグインの不具合の調査、そして修正を生業としています。その合間に、ansible.posixコレクションのメンテナとしての仕事もしています。
このメンテナとしての仕事用に開発環境を作っているのですが、ここ数年の激務で、心も開発環境もだいぶ荒れてきたので、2025年のアップストリーム活動に向けて、コレクションの開発とテストを行う環境を大掃除してコンテナに移行しようと試行錯誤しています。紆余曲折を経て、そこそこ使い物になりそうな環境ができたので、ここでご紹介しようと思います。
アドカレは毎年書いてますが、誰かの参考になりそうな記事は初めて書くかもしれない。
Ansible Collectionの日常的な開発・テスト環境を作る
開発環境
RedHatterなのですが開発環境はMacOSです。ごめんなさい。
- MacBook Pro 16インチ (Apple M2 Pro / MEM 32GB)
- エディタ: Visual Studio Code
- コンテナ環境: Podman Desktop
このような環境の上に開発環境を構築しています。いやpodmanを使うならLinux(x86)ですよね。MacOSとaarch64でわざわざ苦労することもない。わかります。わかりますよ。
しかし、Red Hatは自由な社風なので、僕はMacOSで暮らしてます。自由万歳。
ワークスペースを作成する
まずは開発拠点となるVisual Studio Codeのワークスペース用のディレクトリを作成します。以降はこのワークスペースであるansible_devディレクトリで作業します。
% mkdir ansible_dev
% cd ansible_dev
Ansible Builderをインストールする
まずはカスタムコンテナをビルドするために、virtualenv環境を作ってAnsible Builderをインストールします。
% mkdir builder
% cd builder
% python3 -m venv venv
% source venv/bin/activate
(venv) % pip install -U pip
(venv) % pip install ansible-builder
続いて、execution-environment.ymlを作成します。
できるだけ特別なことはせずに、必要となるパッケージ(rsyncのようにsynchronizeモジュールが必要とするようなもの)やPythonモジュール(デバッグ用のqなど)をインストールする程度にしています。Ansible NavigatorとAnsible-lintをインストールしているくらい。
---
version: 3

images:
  base_image:
    name: quay.io/fedora/fedora:41

dependencies:
  ansible_runner:
    package_pip: ansible-runner
  ansible_core:
    package_pip: ansible-core
  python:
    - ansible-lint
    - ansible-navigator
    - bcrypt
    - passlib
    - pexpect
    - psutil
    - pypsrp
    - pywinrm
    - q
    - six
  system:
    - bind-utils [platform:rpm]
    - gcc [platform:rpm]
    - git [platform:rpm]
    - glibc-langpack-en [platform:rpm]
    - hostname [platform:rpm]
    - iputils [platform:rpm]
    - lsof [platform:rpm]
    - oniguruma-devel [platform:rpm]
    - plocate [platform:rpm]
    - podman [platform:rpm]
    - procps-ng [platform:rpm]
    - rsync [platform:rpm]
    - shellcheck [platform:rpm]
    - sshpass [platform:rpm]
    - sudo [platform:rpm]
    - tar [platform:rpm]
    - tree [platform:rpm]
    - traceroute [platform:rpm]

options:
  package_manager_path: /usr/bin/dnf5

additional_build_steps:
  prepend_base:
    - RUN echo "Install mandatory packages:"
    - RUN $PKGMGR -y -q install python3 python3-pip python3-devel
    - RUN pip install --upgrade pip
  append_final:
    - ENV LANG en_US.UTF-8
    - ENV LC_ALL en_US.UTF-8
    - RUN echo "Create ansible user with sudo privilege:"
    - RUN useradd -m -s /bin/bash ansible && echo "ansible ALL=(ALL) NOPASSWD:ALL" > /etc/sudoers.d/ansible && chmod 0440 /etc/sudoers.d/ansible
...
開発・テスト用のコンテナ(ansible-dev-tool)をビルドする
execution-environment.ymlを利用して、Ansible Builderでカスタムコンテナを構築します。
(venv) % ansible-builder build -f execution-environment.yml -t quay.io/saito_hideki/ansible-dev-tools:1.0.0 --no-cache --prune-images
(venv) % podman images
REPOSITORY                              TAG         IMAGE ID      CREATED         SIZE
quay.io/saito_hideki/ansible-dev-tools  1.0.0       7de76c4274f6  58 seconds ago  1.06 GB
quay.io/fedora/fedora                   41          75628098827e  23 hours ago    194 MB
(venv) % deactivate
これで、カスタムコンテナは完成です。quay.ioにpushして、必要に応じて修正していくことになるので、quay.ioにpushしておきます。
% podman push quay.io/saito_hideki/ansible-dev-tools:1.0.0
Visual Studio Codeのワークスペースファイルを作成する
ansible_devディレクトリにもどって、ワークスペースファイル(ansible_dev.code-workspace)を作成します。中身はpathだけです。
% cat << EOF > ansible_dev.code-workspace
{
    "folders": [
        {
            "path": "."
        }
    ]
}
EOF
Visual Studio Code Dev Containers環境を設定する
VIsual Studio CodeのDev Containersを利用するので、devcontainer.jsonを作成します。
Ansible Navigatorでは、podmanコンテナの実行環境を動かすので、podman in podmanを想定した設定をrunArgsに設定しています。Ansible Builderで作成したカスタムコンテナを指定するのも忘れずに。
また、ここでは、テスト環境として準備してある切られ役のマネージドノード3台(server0[012].example.com)をコンテナの/etc/hostsに追加するよう設定しています。この設定を基本として目的によって設定を編集すればよさそうです。
% mkdir .devcontainer
% cat << EOF > .devcontainer/devcontainer.json
{
    "name": "ansible-dev-container-podman",
    "image": "quay.io/saito_hideki/ansible-dev-tools:1.0.0",
    "containerUser": "ansible",
    "runArgs": [
        "--privileged",
        "--cap-add=CAP_SETUID",
        "--cap-add=CAP_SETGID",
        "--cap-add=CAP_MKNOD",
        "--cap-add=CAP_NET_RAW",
        "--cap-add=NET_ADMIN",
        "--cap-add=SYS_ADMIN",
        "--cap-add=SYS_RESOURCE",
        "--cap-add=CAP_AUDIT_WRITE",
        "--device=/dev/fuse",
        "--security-opt=seccomp=unconfined",
        "--security-opt=label=disable",
        "--security-opt=apparmor=unconfined",
        "--security-opt=unmask=/sys/fs/cgroup",
        "--userns=host",
        "--hostname=ansible-dev-container",
        "--add-host=server00.example.com:172.16.46.100",
        "--add-host=server01.example.com:172.16.46.101",
        "--add-host=server02.example.com:172.16.46.102"
    ],
    "mounts": [
    ],
    "customizations": {
        "vscode": {
            "extensions": ["redhat.ansible"]
        }
    }
}
EOF
Visual Studio Codeでワークスペースを開く
準備ができたら、Visual Studio Codeでansible_dev.code-workspaceを開きます。ワークスペースが開いてビルドしたカスタムコンテナが起動してきます。
- ファイル => ファイルでワークスペースを開く => ansible_dev.code-workspace
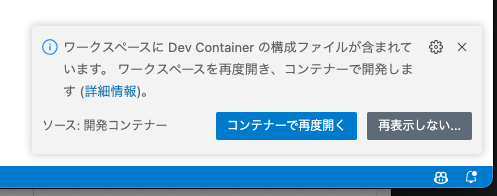
- 右下に表示されるダイアログボックスからコンテナーで再度開くを選択する
VSCODE_DEV_CONTAINER
ターミナルから動作確認
Visual Studio Codeのターミナルを開くと、コンテナ内のシェルが操作できるようになっています。母艦のワークスペースが置かれているansible_devディレクトリは、コンテナの/workspaces/ansible_devにマウントされています。
[ansible@ansible-dev-container ansible_dev]$ cat /etc/fedora-release
Fedora release 41 (Forty One)
[ansible@ansible-dev-container ansible_dev]$ id
uid=1000(ansible) gid=1000(ansible) groups=1000(ansible)
[ansible@ansible-dev-container ansible_dev]$ pwd
/workspaces/ansible_dev
動作確認もかねて、ansible系のコマンドのバージョンを確認してみます。
$ ansible --version
ansible [core 2.18.1]
  config file = None
  configured module search path = ['/home/ansible/.ansible/plugins/modules', '/usr/share/ansible/plugins/modules']
  ansible python module location = /usr/local/lib/python3.13/site-packages/ansible
  ansible collection location = /home/ansible/.ansible/collections:/usr/share/ansible/collections
  executable location = /usr/local/bin/ansible
  python version = 3.13.1 (main, Dec  9 2024, 00:00:00) [GCC 14.2.1 20240912 (Red Hat 14.2.1-3)] (/usr/bin/python3)
  jinja version = 3.1.5
  libyaml = True
[ansible@ansible-dev-container ansible_dev]$ ansible-navigator --version
ansible-navigator 24.12.0
[ansible@ansible-dev-container ansible_dev]$ ansible-runner --version
2.4.0
[ansible@ansible-dev-container ansible_dev]$ ansible-lint --version
ansible-lint 24.12.2 using ansible-core:2.18.1 ansible-compat:24.10.0 ruamel-yaml:0.18.6 ruamel-yaml-clib:None
podman in podmanに対応しているはずなので、念のためpodmanコマンドも機能するかを確認しておきしょう。
[ansible@ansible-dev-container ansible_dev]$ podman ps
CONTAINER ID  IMAGE       COMMAND     CREATED     STATUS      PORTS       NAMES
[ansible@ansible-dev-container ansible_dev]$ podman images
REPOSITORY  TAG         IMAGE ID    CREATED     SIZE
いけてそう。
Playbookの動作確認もしてみます。
ansible.cfg、invenotryファイル(inventory/hosts)、そしてテスト用のPlaybook(playbook/ping.yml)を準備しましょう。
- ansible.cfg
[defaults]
log_path = ./logs/ansible.log
host_key_checking = False
collections_path = ./collections
- inventory/hosts
[testserver]
server00.example.com
server01.example.com
server02.example.com

[testserver:vars]
ansible_user='testuser'
ansible_password='****************'
- playbook/ping.yml
---
- name: Ping all hosts
  hosts: all
  tasks:
    - name: Ping all hosts
      ansible.builtin.ping:
テスト用のPlaybookを実行してみます。
[ansible@ansible-dev-container ansible_dev]$ ansible-playbook -i inventory/hosts playbook/ping.yml

PLAY [Ping all hosts] **************************************************************************************************************************

TASK [Gathering Facts] *************************************************************************************************************************
ok: [server02.example.com]
ok: [server01.example.com]
ok: [server00.example.com]

TASK [Ping all hosts] **************************************************************************************************************************
ok: [server00.example.com]
ok: [server02.example.com]
ok: [server01.example.com]

PLAY RECAP *************************************************************************************************************************************
server00.example.com       : ok=2    changed=0    unreachable=0    failed=0    skipped=0    rescued=0    ignored=0
server01.example.com       : ok=2    changed=0    unreachable=0    failed=0    skipped=0    rescued=0    ignored=0
server02.example.com       : ok=2    changed=0    unreachable=0    failed=0    skipped=0    rescued=0    ignored=0
Ansible Navigatorでコンテナ実行環境をテストする
せっかくpodman in podman環境を準備したので、Ansible Navigatorもテストしてみます。実行環境のコンテナとしてawx-eeを指定してみました。
- ansible-navigator.yml
---
ansible-navigator:
  execution-environment:
    image: "quay.io/ansible/awx-ee:latest"
  logging:
    level: debug
    append: False
    file: ./logs/navigator.log
Ansible Navigatorでテスト用Playbookを実行してみます。
[ansible@ansible-dev-container ansible_dev]$ podman images
REPOSITORY  TAG         IMAGE ID    CREATED     SIZE
[ansible@ansible-dev-container ansible_dev]$ ansible-navigator run playbook/ping.yml --mode stdout -i inventory/hosts
$ ansible-navigator run playbook/ping.yml --mode stdout -i inventory/hosts
----------------------------------------------------------------
Execution environment image and pull policy overview
----------------------------------------------------------------
Execution environment image name:     quay.io/ansible/awx-ee:latest
Execution environment image tag:      latest
Execution environment pull arguments: None
Execution environment pull policy:    tag
Execution environment pull needed:    True
----------------------------------------------------------------
Updating the execution environment
----------------------------------------------------------------
Running the command: podman pull quay.io/ansible/awx-ee:latest
Trying to pull quay.io/ansible/awx-ee:latest...
Getting image source signatures
Copying blob da67aebfb456 done   |
...
Copying config 9083553381 done   |
Writing manifest to image destination
90835533812f20b995b153861ab5806f58aa184856559380acc58b3910166b8e

PLAY [Ping all hosts] **********************************************************

TASK [Gathering Facts] *********************************************************
ok: [server02.example.com]
ok: [server00.example.com]
ok: [server01.example.com]

TASK [Ping all hosts] **********************************************************
ok: [server00.example.com]
ok: [server01.example.com]
ok: [server02.example.com]

PLAY RECAP *********************************************************************
server00.example.com       : ok=2    changed=0    unreachable=0    failed=0    skipped=0    rescued=0    ignored=0
server01.example.com       : ok=2    changed=0    unreachable=0    failed=0    skipped=0    rescued=0    ignored=0
server02.example.com       : ok=2    changed=0    unreachable=0    failed=0    skipped=0    rescued=0    ignored=0
念のため、コンテナ実行環境であるawx-eeがダウンロードされていることを確認してみます。
[ansible@ansible-dev-container ansible_dev]$ podman images
REPOSITORY              TAG         IMAGE ID      CREATED      SIZE
quay.io/ansible/awx-ee  latest      90835533812f  6 hours ago  2.2 GB
ちゃんとできてそう。良い感じだ。今回ご紹介したワークスペースのディレクトリ構造(Level2まで)は以下のような感じです。
% tree -L 2
.
├── ansible-navigator.yml
├── ansible.cfg
├── ansible_dev.code-workspace
├── builder
│   ├── context
│   ├── execution-environment.yml
│   └── venv
├── collections
│   └── ansible_collections
├── inventory
│   └── hosts
├── logs
│   ├── ansible.log
│   └── navigator.log
└── playbook
    └── ping.yml
まとめ
今回ご紹介したように、開発環境をコンテナに移行することにしました。ansible-testコマンドのコンテナランタイムでのテストがまだうまく動作しなかったり、MacOSとpodmanとの組み合わせゆえの面倒くささなどはありますが、その都度対処しながら、アップデートがあれば、この場でシェアしていきたいと思っています(いまのところ)。
2025年は、このコンテナ環境で暮らしながら、アップストリームに貢献する時間をもう少し作りたいな。それではみなさんメリークリスマス&ハッピーニューイヤー。そしてHappy Automating! :)